The Speed Bump That is 6/7

I’m still working on the show I’m doing for a school assembly tour in April. One of the tricks that I had planned is a cards across type effect using postcards. I had a method worked out, then I realized the trick involves counting to ten.

Counting to ten means I’ll have to deal with kids and the 6/7 trend that’s still happening. It’s not as crazy as it was a year ago, but it’s still a thing.

In the past, I’ve used the Piano Card Trick‘s method of pairs to do an object across types of trick. That version has no counting, just moving pairs of cards. That eliminates using the numbers six and seven in sequence.

The downside of using the pair method is that only one thing moves instead of two or three cards. I guess the big plus is that since I’ve used this in shows before, I have a lot of the “bits” built in, so I don’t need to do a lot of figuring out gags. That’s also a bad trap; I shouldn’t be lazy and should be writing new gags.

-Louie
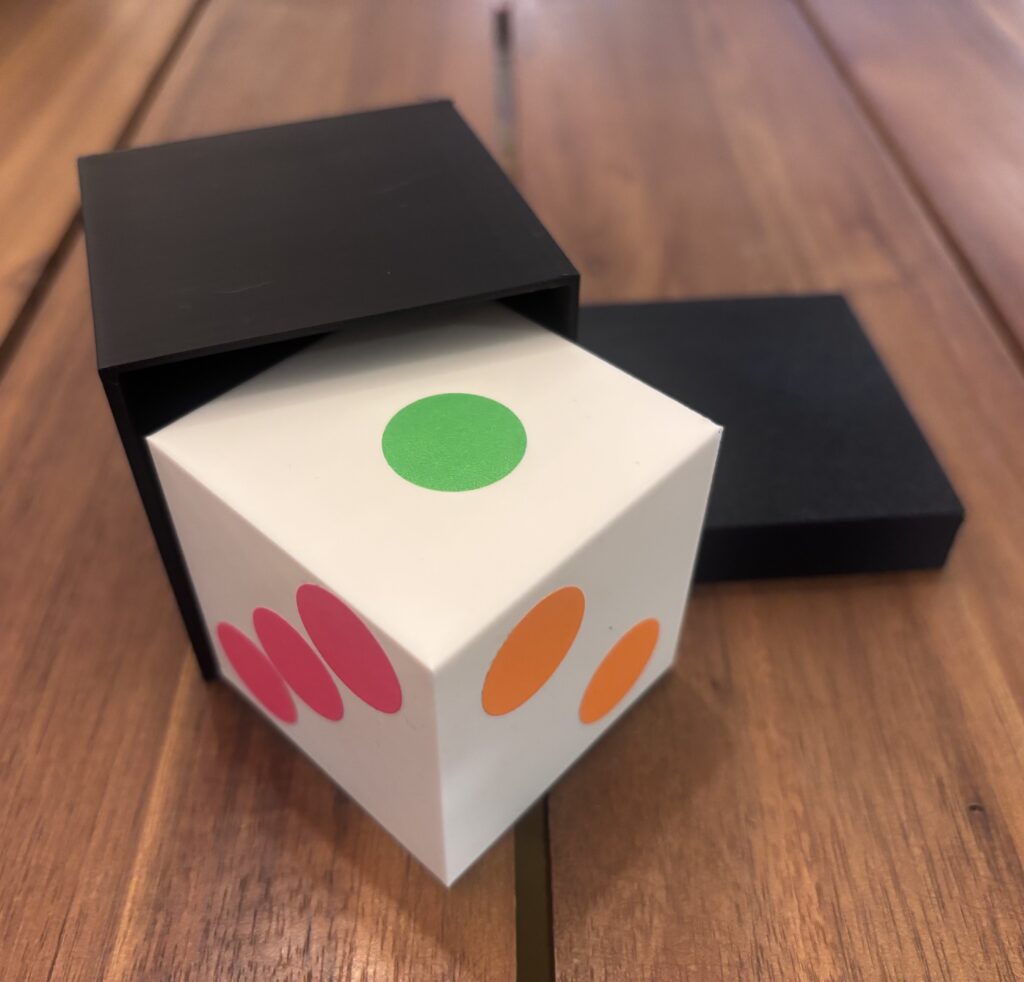
PS If you’re interested in using the piano card trick onstage, look into Jim Steinmeyer’s Apples and Oranges trick.

More Snake Basket Work

I’m still working on my Snake Basket Magic Routine. The basket won’t be a basket; it will be a box. I’ve written on this blog before about why I’m not using a basket for the snake. I want the box to look like a shipping crate, but it also must be light and pack as small as possible. I started with a cardboard frame with gaff tape hinges.

Snake Basket Magic

I then covered the middles of the panels with wood patterned contact paper.

Snake Basket Magic

Finally I did the corners with a wood patterned duct tape to give it the crate look.

Snake Basket Magic

This gave me the look that I was going for without the weight of wood, and it packs flat!

-Louie

Snake Basket Magic Trick V2

This snake basket magic trick I’m working on feels like a “project car” that’s in someone’s garage that they are constantly working on. It’s something I keep finding ways to improve. The first version is barely finished, and I’m working on a second one!

snake basket magic trick

The big change is that I’m going to move it away from a card trick. I’m going to merge it with Terry Seabrook’s Chattering Teeth Routine. The snake will chew holes in the paper, and the reveal will be when the paper is opened. A paper is physically larger than a playing card, even a jumbo playing card. Bigger is better for a reveal!

Moving to paper also allows me to customize the routine to a show. For example, if I were doing a safety-themed show for kids, the snake could chew a stop sign in the paper. It could still be a card a la the original Seabrook routine, or spots (like on a die) or even the image a piece of art!

I’m liking flexibility of this idea!

-Louie

A New Routine with a Block

This is an idea I had a while ago, and 3d printed it:

magic block trick

This is a three phase mental magic type routine. I read someone’s mind, then they read my mind, then a magic trick happens. I took it to a magic meet up and here’s what the magicians think of it:

Billy McComb, in one of his books, mentions an easy way to create new routines is to combine two tricks. I think his example is a thumb tie and card to wallet. The block trick I came up with combines the Color Vision Block with a super old stage magic trick. I don’t think people are expecting the part that uses the old stage magic effect, and by the time that part is revealed, I’m way ahead of them. Also, people newer into magic may not recognize it as it’s not really used much anymore.

-Louie

More Snake Basket Work

The more I work on this snake basket, the more I want to simplify the wiring in it. The previous versions had an LED to indicate that it was on. I eliminated that using the ESP32’s built in LED, so that took out some wires. Here’s the current wiring:

snake basket magic trick

One thing I have that’s redundant is that each action is triggered by a button press. The first version just had a single button that started all of the actions that would be timed. I didn’t like this as it makes me a slave to the preprogrammed timing. To give me more freedom, I added a second remote control button, and both buttons trigger each action. I could eliminate the wired button, however, I can see a situation where it could come in handy, like if the remote unexpectedly ran out of batteries.

The next tweak will be in the code, and that will be adding some delays after the button press. That will get my hands away from the remote control or the wired button when the action takes place.

I think this is coming along nicely, and I’ve learned a lot about using microprocessors!

-Louie

Prop Management

Recently, I acquired a 60+ year old box of magic tricks. I’m guessing this belonged to Portland, OR magicians Duane Duvall. One of the things I think is interesting is looking inside the working cases of magicians. How did they keep their props in the case during their show?

Here’s a look at the case from the 1960s:

Simple solutions to holding things on the lid and around the inside of the case.

-Louie

Improving an 80 Year Old Magic Trick

In the June 1946 issue of The Bat magic magazine, there’s a trick called Puff by Frank Chapman. The effect is that you have a small piece of paper that you roll into a tube. You blow through the tube, and a ribbon comes out. That’s it. I think the effect can be changed a little bit to make it better.

First of all, why produce a ribbon? Ribbon isn’t valuable or interesting. The only reason I can think of is to do a trick with the ribbon.

Second, why not add a layer to this? Right now you snuck ribbon into a tube of rolled up paper.

Here’s my idea to address those two things.

Effect: You show a small piece of paper that has the colors of the rainbow printed on it. Someone picks a color; you then roll the paper into a tube, and that color confetti flies out.

Needed: A piece of paper with a rainbow printed on it. This would be the six color rainbow. The colors are red, orange, yellow, green, blue, and purple in that order. You’ll also need a thumb tip with a small hole at the tip and some yellow confetti.

Set up: Put the confetti into the thumb tip. The thumb tip starts on your thumb, and you’re holding the piece of paper.

Working: Show the paper and force the color yellow using the “hot rod force”. Roll the paper into a tube around the thumb tip. Lift the tube with thumb tip to your lips and blow through the end with the small hole. As the confetti flies out, put the thumb tip on your other thumb as you unroll the paper.


That’s it. Super easy, not much to it, but the trick is better. The force of a color makes it a bit more of a head scratcher. The confetti falling is visually interesting, and no one expects you to scoop it up and do something with it. Confetti falling is a period, not a comma.

-Louie

Working on a Snake Basket…

For decades, I’ve wanted to do a snake basket that combined the two popular versions from the late 1990s. Those two were Terry Lunceford’s Viper and Collector’s Workshop’s Khyber Kobra. I wrote a blog post about those two a few months ago, which includes videos of them; you can read it here. In a nutshell, I wanted to combine the two of them, so there’s the byplay of the Khyber Kobra with the ending of the Viper.

I’ve been working on learning to use Arduino and over the summer I made a working model on an Arduino simulator, but haven’t had time to actually make it, until a few days ago.

snake basket magic trick

The arrangement above has a lot of wires, but it works! All of the functions do their thing. Like any project, once it becomes a physical thing, it will change. I realized I could eliminate one motor and have one servo handle two tasks. The motor would make the snake rise, then the servo would make it move back and forth. I decided to eliminate the motor and have the servo make the snake rise and shake. That simplified this a lot, and here’s the new wiring:

snake basket magic trick

Usually, simpler is better; here’s less to go wrong, and it’s easier to diagnose if something does go wrong.

The next step will be to move it from an Arduino UNO board to an ESP32 board and put everything onto a PCB board for more sturdy final version of this.

-Louie

Unforeseen Challenge!

6 7

Right now I’m writing a show that I’ll be doing for a elementary school assembly tour in April. One of the challenges is that I’m trying to avoid the whole 6 7 thing.

That makes counting tricks a challenge and there’s a card across type trick that I’ve written into the show. I don’t want to lose control halfway counting a packet of cards, and that needs to be done four times!

Right now is that my plan it to talk about the objects as I’m counting them. That would break up the 6 to 7 with dialogue between them. I’m not sure if that will work, but it’s an idea. Another idea is to use 9 items instead of the traditional 10. Then if three items move from one packet to the other, that will reduce the counting that will have the numbers 6 and 7 from four times to three times.

Another option would be to not have the trick about counting, but about specific items moving from pile to pile. So three red backed cards end up in a blue backed packet.

I’m not sure how this will play out…

-Louie

Vanishing Bottle Routines

Yesterday, I posted a little routine for the latex vanishing bottle prop. If you haven’t read it, you can read it here and do that before you read this as what follows will make more sense. Here are some ideas for yesterday’s routine:

  • Use two bags instead of one so that the item travels across the stage.
  • Say they’ll change places, the spin the bag 180 degrees.
  • If using two bags, one could be labelled “full” and the other “empty”. You then turn the bags around, and they have the other word on the back.
  • To add a layer, to make the method harder to back track, you could start with a variety of drinks that are different colors and force the latex bottle.

There you go, a few ideas to expand the routine.

-Louie